Zoom
Zoom is a cloud-based video communications tool that allows you to set up virtual video and audio conferencing, webinars, live chats, screen-sharing, and other collaborative capabilities. University of Toronto Licensed Zoom accounts are required to host and participate in Zoom-based classes, meetings, and webinar sessions. Zoom can be used for both synchronous (e.g., live webinar sessions, virtual meetings, and online office hours) and asynchronous teaching (e.g., pre-recorded teaching materials to share with your class).
This page refers to the Zoom Web Portal.
Consult Zoom – Quercus Integration documentation for instructions on using the integration.
Where can I get more support?
Related resources / similar tools
Changes Coming to Zoom Recordings Protocol for Undergraduate Students
There will be an update to the recording protocol on Zoom’s video conferencing and webinar service that may affect undergraduate students’ existing recordings saved to the Zoom Cloud and how undergraduate students can save future recordings.
Effective May 1, undergraduate students will no longer be able to save their recordings to the Zoom cloud storage. Additionally, the 365-Day Retention Protocol will still be in effect for all recordings saved to the Zoom cloud prior to May 1, 2023. All recordings made prior to May 1, 2023 will only be held in the Zoom Cloud for 365 days starting from their recording date.
Undergraduate students will continue to be able to save their recordings to their local device (e.g. computer) but not to the Zoom cloud storage. For more information on how to record locally, visit the ‘Recording a Zoom Meeting’ section in this Zoom Tool Guide.
Undergraduate students who want to preserve Zoom videos recorded prior to May 1 should download their content from the Zoom cloud onto alternate storage. This can include local or network storage, Microsoft OneDrive and MyMedia Hosting and Sharing. Visit the ‘Download and Host Zoom Recordings’ section of this Zoom Tool Guide page for instructions.
365-day Zoom Cloud Recordings Retention Protocol
U of T has implemented a 365-day retention protocol on Zoom recordings video-conferencing and webinar service that may affect your existing recordings saved to the Zoom cloud.
All recordings saved to the Zoom cloud prior to July 5, 2021, were automatically deleted on July 5, 2022. At the same time, an ongoing 365-day retention protocol will be implemented for new Zoom Cloud recordings. Recordings created after July 5, 2022, will only be held on the Zoom Cloud for 365 calendar days prior to subsequent deletion.
Current users who want to preserve older Zoom recordings for future use should download their content from the Zoom cloud onto alternate storage. This can include local or network storage, Microsoft (MS) OneDrive, MS Stream or MyMedia Hosting and Sharing. View the Download Zoom Recordings section of this page for instructions.
View the Academic, Research & Collaborative Technologies (ARC) Zoom Page for more information.
Long distance charges may apply if you are joining the session using a telephone and if you are using the Telephone Audio option. It is recommended that you only use computer audio for Zoom.
An Instructor/teaching assistant can host meetings with unlimited minutes for up to 300 participants.
How to Get Started
Zoom is a cloud-based video communications tool that allows you to set up virtual video and audio conferencing, webinars, live chats, screen-sharing, and other collaborative capabilities.
How to Use This Tool
University of Toronto Licensed Zoom accounts are required to host and participate in Zoom-based classes, meetings, and webinar sessions. Zoom can be used for both synchronous (e.g., live webinar sessions, virtual meetings, and online office hours) and asynchronous teaching (e.g., pre-recorded teaching materials to share with your class).
Instructions
-
Downloading and Installing Zoom
Note: Installation is only required when using Zoom for the first time. If you have already downloaded and installed Zoom, please skip below to Logging into Zoom Using a Web Browser.
- Visit https://zoom.us/support/download
 to download the latest version of the installer.
 - Run the downloaded file. The installation should complete automatically.
- When prompted, enter the display name you wish to use.
- If you need to update an existing Zoom account, consult How to Update the Zoom computer application
 .
.
- Visit https://zoom.us/support/download
-
Logging into Zoom Using a Web Browser
Log into the University of Toronto Zoom Portal from a web browser – https://utoronto.zoom.us

and sign in with your UTORid.
Logging into Zoom Using the Desktop Application
If you have downloaded the Zoom desktop application to your Apple or Windows computer,
- Open the application.
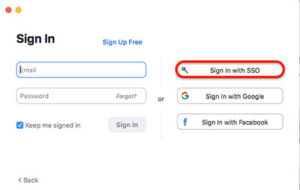
- Select the Sign In with SSO button on the right, as noted in the screenshot below.

- Select the Sign In with SSO button on the right, as noted in the screenshot below.
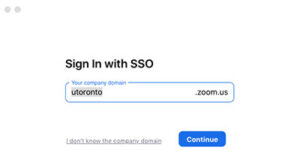
- Ensure that utoronto.zoom.us appears in the Your company domain box and click on the Continue< button.
- Log in with your UTORid and password.

- Open the application.
-
Set up a Meeting or Class
Set up a Meeting in the Zoom portal.
Instructors can create one-time or reoccurring meetings in Zoom.

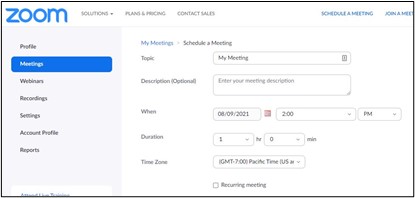
- Select Schedule a Meeting on the top menu bar.
Alternatively, select Meetings from the left sidebar, then select Schedule a Meeting on the right side of your screen.

- Fill in details for your meeting.


- Enter the session title in the Topic field. You can also enter session Description.;
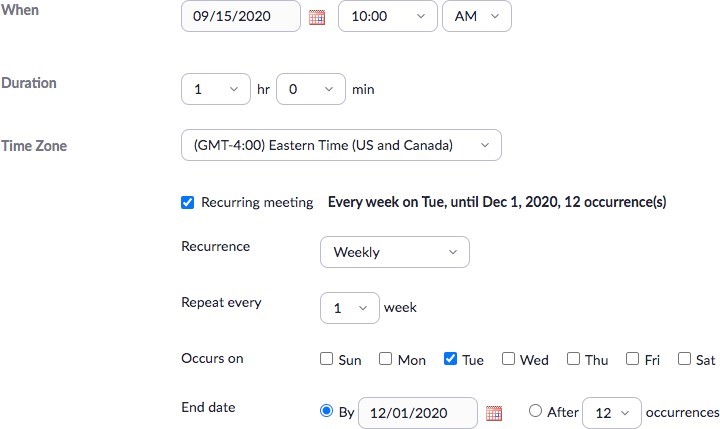
- Select the date, time, and duration of your class.
- Select the Eastern Time Zone (GMT -4:00_ for Toronto.
- Check the Recurring Meeting checkbox for regular, reoccuring classes, office hours, or tutorial sessions.
- Select the recurrence, repeat interval, and day of the week.
- Use a Passcode to help prevent unauthorized participants. The Passcode can be edited, if you wish.
- The Waiting Room is enabled by default. The Waiting Room is a virtual area that stops your participants from joining until you admit them. You may wish to keep this checked if you have a smaller class and you or the co-host (typically your TA) can monitor the room to admit late students or students who need to reconnect. You can disable the waiting room once you start the lecture.
- Check Require authentication to join and select Only allow UofT users under site license to join. This will prevent participants from joining your Zoom session if they do not have a UofT Zoom account. This will make your Zoom meeting more secure and can also save you from having to admit students from the Waiting Room. It also provides student’s UofT names in the meeting participants list. Note: You can set Authentication Exceptions if you have guests joining the session.
- Check “Automatically record meeting and choose the location to store your recording. Recording can be initiated during the meeting, as well. Note that Zoom recordings are stored for 120 days and then deleted. You may wish to record directly to your local computer.
- Autosave your session chat
 under the Meetings tab. Only public messages will be saved. If you save the chat to your local computer, messages sent to you will also be saved.
 - Save your changes.

- Share your meeting invitation – Select Copy Invitation. Add it to a Quercus announcement or under the appropriate Quercus Module as an external link. For other ways to invite others to a meeting, refer to Inviting others to a scheduled meeting
 .
.

- View Meetings – Select the Meetings tab. Choose to view Upcoming, Previous, or Personal Room meetings.
Configure Settings
Customize your Zoom classes for accessibility and recording retention.
-
-
- Select the Settings Tab on the Zoom Portal menu.
- Customize settings as required.
-
Configure Captions
-
-
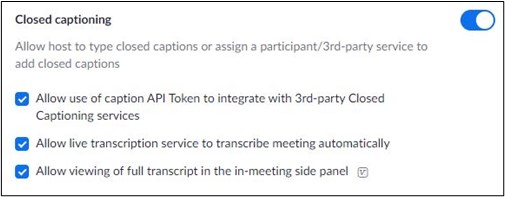
- In the Zoom Portal menu scroll down to Settings > In Meeting (Advanced).
- Ensure that the settings for captions is turned on captions for participants.
-

Keyboard and Screen Reader Accessibility
-
-
- To ensure keyboard support within the Zoom desktop meeting, set the toolbar to always be visible.
- Navigate to “Always show meeting control toolbar.
- Press enter to enable setting.
- Refer to Keyboard shortcuts for Zoom
 for additional information.
-
Configure Hosting Settings
-
-
- In the Zoom web portal go to Recordings > Settings:
- Cloud Recordings: This setting allows you to store and search your recording on the
Zoom web portal, share it via a link, or download it.
Note that Zoom Cloud recordings are only retained for 120 days - Local Recordings: Selecting this setting will navigate you to a page under Recording , where you can decide on how a meeting to be recorded, by selecting appropriate features
- Cloud Recordings: This setting allows you to store and search your recording on the
- In the Zoom web portal go to Recordings > Settings:
-
Customize the Zoom Cloud Recording settings
If you plan to record to Zoom Cloud (rather than locally), configure settings before your meeting.
-
-
- Select Settings > Recording tab and verify that the Cloud Recording setting is enabled.
- Look for the Settings under the Cloud Recording heading. Review the options and select your preferences.
- Save your Setting. Once you have chosen your Settings you are ready to start recording!
-
Things to consider before you select the options that apply to you:
-
-
- Do you want to include the speaker video in the recording? If so, selectRecord active speaker with shared screen.
- Do you only want to include the shared screen (which may contain your slide presentation and/or demonstration of computer applications)?
- Do you want separate video files for the active speaker, gallery view and/or shared screen? (This option is most useful for people who like to edit their videos and want the most control).
- Is this for a pre-recorded lecture component or a recording of a live lecture event? This may impact how much you want to capture in the video!
- Consider the privacy of your attendees. They may not want to be included in the recorded video.
- Save Chat messages information is available at Saving in-meeting chat
 .
.
-
- Select Schedule a Meeting on the top menu bar.
-
Join a Meeting
-
-
- To join a video conference, click on the link provided in an invitation e-mail.
- When prompted, click “Launch Application“.(/li>
- Select either “Join by Computer Audio” or “Join by Phone“.
-
Join a Meeting – Computer Audio
Note: While preferred, this option will require a microphone and/or webcam to be connected to your computer. Please do not use the Telephone Audio option as long distance charges may be incurred.
-
-
- At the top of the window, select “Join by Computer” (it will be highlighted in blue) and press “ Test Computer Audio“.
- Using the “Test Speaker” and “Test Mic” buttons, ensure that audio input and output are both responding correctly. * If one is not working, the audio device in use can be changed using the two drop down menus, followed by repeating step 2, to test the new configuration.
- Close the “Settings” window.
-
-
-
Holding a Meeting
- Log in to the Zoom panel.
- Find your Zoom meeting under Meetings.
- Select Start to start the meeting.
- To admit students from the waiting room, select Participants.
- Find students who are waiting and select Admit to admit them into the meeting. Alternatively, select Admit all to admit all waiting participants at once.
- To invite others to a meeting during the meeting, refer to How Do I Invite Others
 .
. - To mute all attendees, select the Mute All button at the bottom of the Participants bar.
- To deactivate the waiting room, select the More button and choose Enable Waiting Room to turn off the feature.
- To promote an attendee, open the Participants bar, hover over a name and select More . Make Host.
- If you haven’t configured your recording to start automatically, select the Pause/Stop Recording button. When the meeting ends, the recording will be saved locally on your computer or in Zoom cloud, depending on your settings.
-
Captions and Transcripts
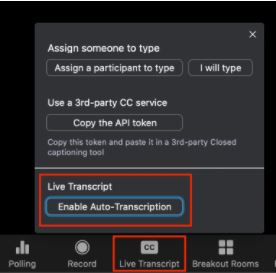
Meeting Hosts Meeting Participants - Select the Live Transcript button in the host control bar.
- Under Live Transcript, select Enable Auto-Transcription.
- Attendees will be notified that Live Transcript is available.

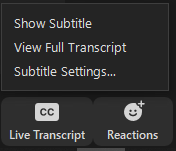
After the host has activated Live Transcript, participants: - Select the Live Transcript button.
- Individuals can choose:
- Show Subtitle – Transcript will appear as video subtitles on the main pane. To change subtitle size, select the Live Transcript > Subtitle Settings.
- View Full Transcript – the transcript will appear in a side-panel. Towards the end of the meeting, participants can select Save Transcript at the bottom of the Transcript pane to download it to their computers.

-
Share Screen, Whiteboard, Annotations
- Select the Share Screen button located on your meeting controls. Do not select the small ^ arrow next to Share Screen unless you want to change screen share options.
- You will see an option to select your whole Desktop. any application windows that are open, a whiteboard or other screens that are connected. Select an option.
- Select the Advanced tab at the top of the screen for more options:
Portion of the Screen Select a portion that you want to display after you share, by dragging the green border. Music or Computer Sound Only Only play audio. Content from 2nd Camera Display content from a secondary camera, such as a document camera. Once you share, select Switch Camera in the top-left corner to switch the shared camera. - Enable optional features by checking their boxes:
Share Computer Sound Any sound played by your computer will be shared. Optimize for full-screen video clip Play a video in full-screen mode. - Select Share. Zoom will switch to full-screen to optimize the shared setting view. To exit full-screen, select Exit Full Screen in the top-right corner or press the Esc key . Your meeting controls will move to the top centre of your screen and can be positioned by dragging them to other locations. If you don’t see all the controls, select … More.
Refer to Zoom Knowledge Base on Share Screen, Whiteboard, Annotations
 for more information on any of these topics.
 -
Chat, Q&A, Non-verbal feedback, Polling
Chat: The in-meeting chat allows you to send chat messages to other users within the meeting. You can post messages to the entire group or specific individuals. The meeting host can choose whether to enable or disable the chat, or disable private chat. Refer to the Zoom Knowledge Base on Chat
 for instructions on these options.
Q&A: Enables attendees to ask questions during webinars and hosts can reply. If enabled, attendees can answer and upvote questions. Refer to the Zoom Knowledge Base on Q&A
 for instructions on these options.
Non-verbal Feedback: If enabled, meeting participants can use icons to communicate to the host without disrupting the flow of a meeting. One example is the Raise Hand icon that appears beside the partipant’s name to simulate a hand raise. Refer to the Zoom Knowledge Base on Nonverbal Feedback
 for information.
Polling: This feature allows hosts to create sing choice or multiple choice polling questions that can be launched during a webinar. The poll can be downloaded after the webinar. Polls can be conducted anonymously or with names. Refer to Zoom Knowledge Base on Polls
 for details on how to set up polls.
 -
Breakout Rooms
Zoom breakout rooms let users split meetings into up to 100 breakout rooms with up to 50 participants in each breakout room. Hosts can split participants manually or allow the system to do it automatically. Automatic splitting assigns the same number of people to each room. You can also let your participants choose a room themselves. Refer to Zoom Documentation on Breakout Rooms
 for more information.
-
-
- Log in to the Zoom web portal.
- Select Account Management > Account Settings.
- On the Meeting tab, navigate to Breakout Room and toggle the switch to On.

- If you want to pre-assign participants
 to rooms, check the box that gives hosts this permission.
 - Once breakout rooms are available, start a meeting on Zoom then select Breakout Rooms.
- Select the number of rooms you want to make. You can make up to 50 breakout rooms.
- Choose how to assign participants to rooms. You can pick between automatic (Zoom will split participants evenly between rooms), manual options (place participants into specific rooms), or let users choose their own rooms.
- Select Create Breakout Rooms.
- Select Options for breakout rooms (use the gear icon on macOS).
- Allow participants to choose room: participants can select and enter rooms on their own.
- Allow participants to return to the main session at any time
- Automatically move all assigned participants into breakout rooms (if unchecked, participants will need to select Join.
- Auto close breakout rooms after () minutes: breakout rooms end after a specified time.
- Set Countdown timer: participants will see a timer of how much time is left.
- Select Open All Rooms to start the breakout session.
- Broadcast a message to all breakout rooms by selecting Breakout Rooms in the meeting controls. Select Broadcast message to all and enter your message. Select Broadcast. The message will appear in all rooms.
- Your recording location will affect the ability to record Breakout Rooms.
Recording to the Cloud If you are recording in the main room and enter a breakout room, the recording continues in the main room and doesn’t follow you to the breakout room. Recording locally to your Computer If you are recording locally and join a breakout room, the recording will stop in the main room and follow you to the breakout room. Assign recording privileges Select Participants > More to Allow Record. The recording is saved locally to the computer of the person who initiated the recording. The recorder can share the recording as required. - Select Close All Rooms to close rooms after a 60-second countdown. Participants are returned to the main meeting.
-
-
-
Recording a Zoom Meeting
Zoom meetings can be recorded locally to your computer device and to Zoom cloud. Local recording is available for all accounts. However, the ;hosts, by default, are the only people who can record. Other participants can be granted the ability to record.
For more support and an excellent chart comparing Local Recording vs Cloud Recording, please refer to FASE’s (Engineering) Support Page on Zoom.
Start a Local Recording
The host needs to record the meeting or grant the ability to record to a participant.
-
-
- Start a Zoom meeting as the host.
- Select the Record icon in the toolbar at the bottom.
Note: What is seen on the host’s screen is what will be recorded.
Note: The recording can be started and stopped multiple times. Each time the user clicks strong> Stop , Zoom will store a snippet. - Hosts and participants will see a recording indicator in the top-left corner while recording is active.
- Participants will see a message that recording has started.
-
After the meeting has ended, Zoom will process the recording. Once the conversion process is complete, the folder containing the recording files will open. Please refer to Download Zoom Recordings to view the types of recording files.
Zoom strongly recommends keeping the default location on a local drive for recordings. It is because setting the default location to a cloud syncing folder (e.g., One Drive or Google Drive, et al.), an external drive, or network storage device may cause issues with saving and converting the local recording.
To view a list of local recordings, log in to the Zoom portal, select Recordings > Local Recordings. A list of your recordings will be displayed. By default, local recordings will be saved to the following directories and can be opened directly from there:
Windows: C:\Users\[Username]\Documents\Zoom
Mac: /Users/[Username]/Documents/Zoom
Linux: home/[Username]/Documents/ZoomStart a cloud Recording
When you choose to record a session to Zoom Cloud, the video, audio, and chat text are recorded in the cloud. The recording files can be downloaded to a computer or streamed from a browser.
However, before you start to record a session to Zoom Cloud, you may consider customizing your Zoom Cloud recording settings.
To record a meeting to the cloud:
-
-
- Start a meeting as the host.
- Select the Record button.
- Select Record to the Cloud optionto begin recording.
- To stop recording, select Pause/Stop Recording or End Meeting.
- Once the recording has been stopped, the recording must be processed before viewing.
- Zoom will send an email to the host’s email address when the process is completed. There will be two links in the email, the first will be for the Host-only, to manage the recording. The second link will be for the participants.
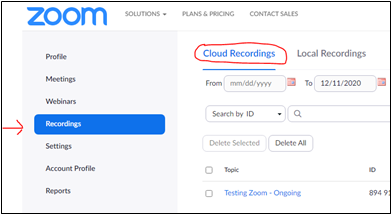
- To access Zoom Cloud recordings, log in to the Zoom portal, select Recordings > Cloud Recordings . A list of your recordings will be displayed.
-
-
-
Downloading and Hosting Zoom Recordings from Zoom Cloud
To access recordings on Zoom Cloud:
- Sign into your Zoom web portal.
Go to the University of Toronto Zoom Portal from a web browser (https://utoronto.zoom.us (Links to an external site.)) and sign in with your UTORID and password.
You can also use the Zoom desktop application to access the tool.- Open https://utoronto.zoom.us (Links to an external site.)) or open Zoom. on a desktop application, if downloaded.
- Select Log in to Zoom.
- If using the desktop application, select the Sign in with SSO button.
- Ensure that zoom.us appears in the Your company domain box and click Continue.
- Log in with your UTORid and password.
- Select Recordings in the navigation menu, then Cloud Recordings.
Select a recording under Topics.
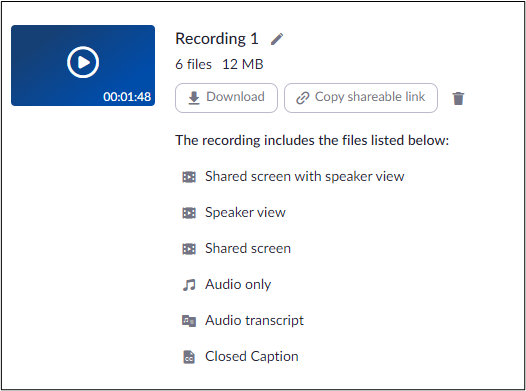
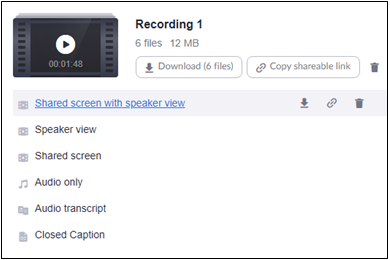
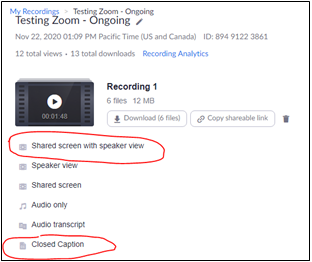
- To download all the files associated with recording select Download > More. You will be able to download all of these files:
- Shared screen with speaker view: MP4 file with audio and video showing both active speaker view and shared content (recommended format to use).
- Speaker view: MP4 file with audio and video showing the active speaker view only.
- Shared Screen: MP4 file with audio and video showing the shared screen only.
- Audio only: M4A file with a recording of the audio.
- Audio transcript: VTT file with a transcript of the audio only.
- Closed Caption File: can be uploaded to a hosting option to provide closed captions.
- To download individual files, select the recording name.
You will see the option to download the following files. See the chart, underneath for details on each type of downloadable file.

File Types
File Type Details 
Shared Screen with Speaker View 1280×1024 .mp4
RECOMMENDED FORMAT TO SHARE. MP4 file with audio and video showing active speaker view and shared content. 
Speaker View _avo_640x360.mp4
Speaker view. MP4 file with audio and video showing active speaker view only. 
Audio Transcript .transcript.vtt
Audio Transcript with the speaker name. VTT file with a transcript of the audio only. 
Shared Screen _as_1280x1024.mp4
MP4 file with audio and video showing shared screen only. 
Audio Only .M4a
Audio only – no video. M4A file with a recording of the audio. 
Closed Caption .cc .vtt
Closed Caption – no speaker name. - Hover over a file name and click the down arrow beside a file to download to your computer. Downloaded the Shared Screen with Speaker View That gets you both the active speaker view and shared content. We recommend using the Shared screen with Speaker View and Closed Caption files to save your work to one of our hosting options, MyMedia or MS Stream.


Hosting Options
The University of Toronto supports two media hosting sites Microsoft Stream and MyMedia.

Zoom Cloud recordings can be download it to MyMedia, MS Stream, or saved to your local computer if you wish to retain your recording within 120 days.
Accessibility
If Zoom meetings or webinars are recorded and saved to the cloud, Zoom can generate captions for the archived recordings. Therefore, the recommended practice would be to download the MP4 files and VTT file from Zoom Cloud to your computer and then upload to one of media hosting sites—My Media or MS Stream—that is supported by University of Toronto. This allows you to share recordings with captions.
- Sign into your Zoom web portal.
Guides
-
Effective Practices for Online Learning
-
-
- Only use the waiting room feature if you have a co-host or a smaller meeting. Otherwise you will be required to manually admit participants.
- Make sure that you are connected to a stable network connection, preferably a wired connection.
- Instructors will need a good camera, microphone, speakers/headphones.
- Have your documents/files ready to share before your class starts.
- Connect to the session a few minutes early to ensure connections and welcome students.
-
-
-
Additional resources
UTM ITS Zoom Index of Knowledge Base articles (requires UTORid and password):
https://uoft.service-now.com/utm_iits?id=kb_article&sysparm_article=KB 0011068
Academic, Research & Collaborative Technologies (ARC) Zoom information (details on account creation, zoom licence scenarios):
https://act.utoronto.ca/zoom-information/
U of T Faculty of Applied Science & Engineering (FASE) Documentation on Zoom:
https://ito-engineering.screenstepslive.com/s/ito_fase/m/95272
Academic, Research & Collaborative Technologies (ARC) Enterprise Video-conferencing & Video Meeting Resources:
https://act.utoronto.ca/enterprise-video-conferencing-video-meeting-resources/
U of T Faculty of Applied Science & Engineering (FASE), which webinar tool should I use (and when)?:
System Requirements for Mac, PC and Linux (Please see Bandwidth Requirements on this page)
https://support.zoom.us/hc/en-us/articles/201362023-System-Requirements-for-PC-Mac-and-Linux
Introductory videos for using Zoom
https://support.zoom.us/hc/en-us/articles/206618765-Zoom-Video-Tutorials
-
Participant Attendance Report
-
-
- Log in to your Zoom Portal at https://zoom.us/signin

or https://utoronto.zoom.us/ to login with UTORid with the utoronto zoom account.
 - Select Reports in the left side menu.
- Select Usage Reports > Usage.
- Select the required meeting.
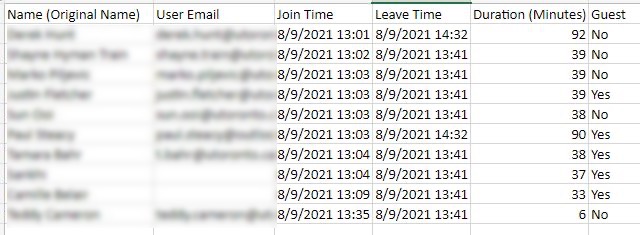
- Scroll to the right to the Participants column and click on the number.
- You can see the report onscreen and have the option to Export to CSV (spreadsheet) format.


- Users that are not logged into the same Zoom (University of Toronto) licence will appear as “Guest.”
- Log in to your Zoom Portal at https://zoom.us/signin
-
-
Private Chat Warning
Zoom’s private messages may show up in a downloaded copy of a chat, if saving is enabled. Before sharing a chat recording, please review what is included, as the person who receives the shared chat will see the private messages meant only for you.
- If a person with recording privileges chooses to record a Zoom meeting to the cloud, in-meeting chats sent publicly (to everyone in the meeting) are saved.
- If a person with recording privileges chooses to record a Zoom meeting locally, to a computer, then chats sent publicly, as well as any private chat exchanges that the person recording participated in during the session, are saved. That means if the person saving the chat sent or received a private message, their recording of the chat will include those messages.
As has always been the case, a person who opts to record a meeting does not receive chat transcripts from private conversations that they did not participate in.
It’s still best practice to avoid sending potentially sensitive private messages on Zoom .
Some students who have temporary credentials (QQid) are reporting errors accessing Zoom meetings. Instructors have the discretion to set authentication in the web client in the security settings. If you implement this, turn on the waiting room or use a password for extra security. This setting can be found by selecting Settings > Meeting tab > Security > Only authenticated users can join meetings. Toggle to enable or disable.
Last Modified:
16 March, 2023
This work is licensed under a Creative Commons BY-NC-SA 4.0 International License

